Clean The Lenses For Crystal Clear Photos
For smartphone photos, Your mobile phone spends a lot of time in your hands, as well as your purse or pocket.
And as a result, the camera’s lenses can get covered in dirt, dust, and fingerprints.
A dirty lens will leave smudges, blurs, or dust spots on your photos.
Adjust focus and exposure
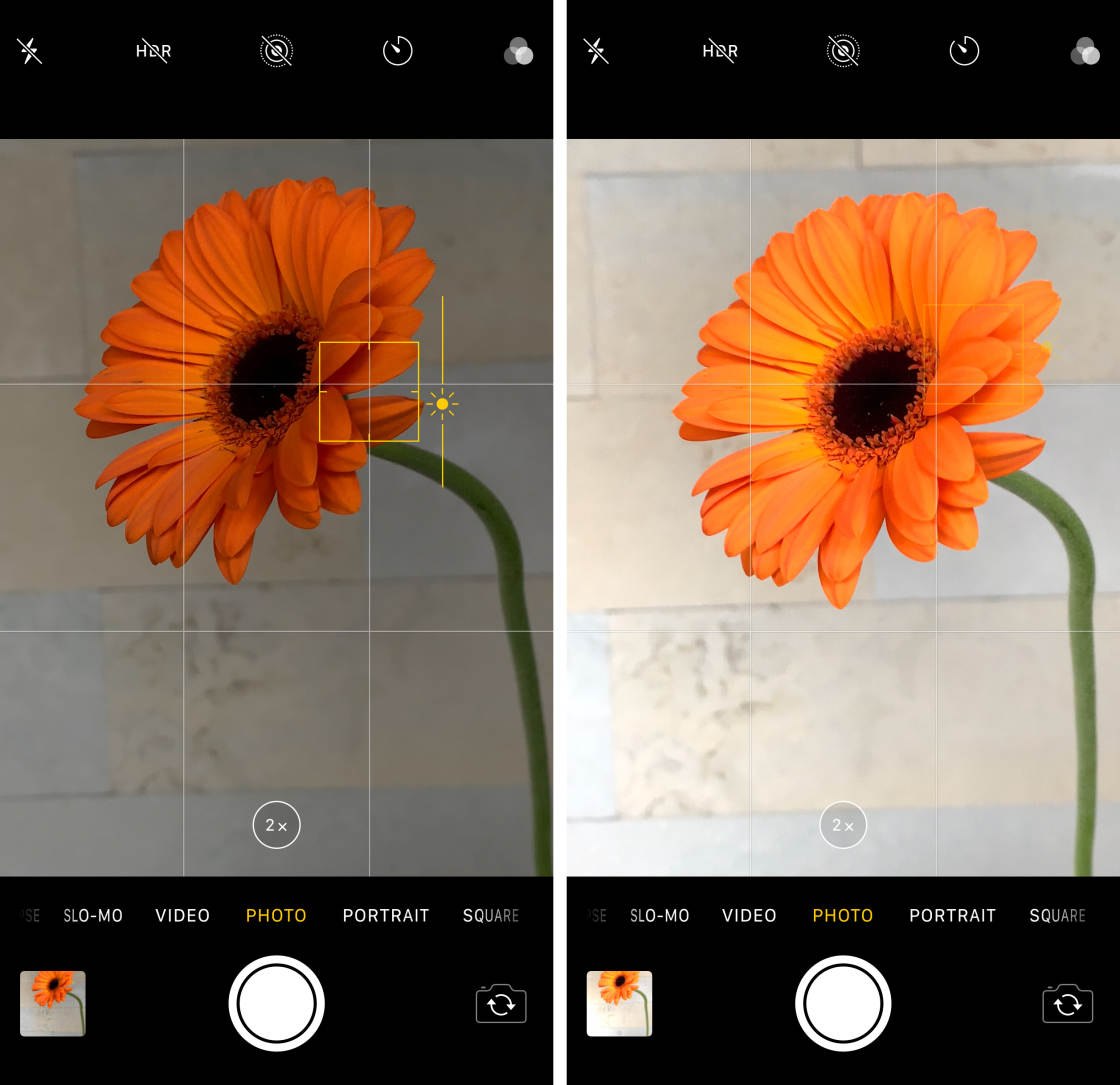
Smartphone cameras have come a long way in a short time, and most handsets now give you some control over the focus and exposure of your shot. If manual focus is available, it’s usually activated with a tap on the screen, on the point where you want the camera to focus.
Check in the settings for your phone’s camera app too. If you find a face recognition option, it’ll automatically zero in on faces, helping you avoid shots where your friends’ faces are a blurred mess.
Then there’s the exposure, or how much light is allowed into the frame. In the default iPhone camera app (shown above), you can tap once to focus, then hold and drag to adjust the exposure. It’s a similar story in the camera app for stock Android: Tap once for focus, then you can adjust exposure via the slider that pops up at the side or top of the screen.

Use HDR mode
HDR, or High Dynamic Range, is now a staple feature for smartphone camera apps. Simply put, it brings detail out of the darkest and lightest parts of your picture and creates a better balance of colors overall. The downside is that, in HDR mode, photos take a little longer to process while your smartphone works all this out.
It’s particularly suitable for landscapes and portrait shots, especially when there’s a wide range between the darkest and lightest parts of your photo. As it takes a few milliseconds longer to take a snap though, you should avoid using it on fast-moving subjects or when you can’t keep your phone steady.
Whatever your make and model of phone, you should see “HDR mode” in a prominent place somewhere on screen. It’s also likely that you can set this to automatically kick in (as on stock Android, above), which means HDR mode will activate whenever the camera senses it could be useful. You can also turn HDR mode on and off manually.
Set The Focus To Ensure Your Subject Is Always Sharp
Even if your lens is perfectly clean, sometimes your subject just doesn’t look sharp.
That’s because the camera’s autofocus doesn’t always focus where you want it to.
To ensure your subject is always in sharp focus, you’ll need to set the focus point manually.
Simply compose your shot, then tap on the screen where you want to set focus.
(You’d normally want to set focus on your main subject.)
A yellow box will appear to indicate the focus point.
Now, just press the shutter button to take your photo.
The area that you set focus on will appear crisp and sharp.
Anything in front of or behind the focus point may appear out of focus.
Use natural light where possible
Light is one of the most important factors in any photo. If you can make use of the available natural light, then you don’t have to resort to your phone’s built-in flash (which may give you less-than-ideal results, particularly at a distance).
If you can, position your subjects so they’re well-lit from the front and not silhouetted by a strong light from behind. Of course, this isn’t always possible for quick shots, but do what you can.
Using artificial light can work too, though you need to take more care. In a night scene, for example, get your friends to stand closer to the glow of artificial lights rather than deeper in the shadows, and make sure their faces are as well-illuminated as possible. Using the flash can help, but if you have time, try one shot with flash and one without to see the difference.
Setting the focus is one of the best mobile photography tips you can learn.
It’s so simple to set focus. And it results in beautifully sharp photos that will stun the viewer!
Edit images on the go
Getting good pictures from your phone doesn’t start and end with your camera app of choice. You can also add a photo editing app to the mix to tweak your shots before sharing them with the wider world.
You’re spoiled for choices in this department. In addition to the native photo gallery and editing apps supplied by Apple and Google, alternatives such as Snapseed (above), Adobe Photoshop Express, and VSCO can do wonders with your pictures. Adobe is even incorporating AI into their photo editing apps.
You can add filters, tweak colors, straighten images, and more. Also keep an eye out for the “one touch” fixes that enhance your pictures with minimal effort from you. Some image editing apps import photos taken by your camera, while others have an integrated camera component of their own.
Shoot In Portrait Mode To Create Gorgeous Blurred Backgrounds
If your Phone camera has Portrait mode, you can easily blur the background when taking pictures.
Portrait mode uses depth-effect software to keep your foreground subject sharp while blurring the background.
Compose your shot, making sure your subject is between two and eight feet away. (The depth-effect won’t work if your subject is too close or too far away.)
When you see the words Natural Light in yellow, you’re ready to take a shot.
Decoding ChatGPT: The Language Wizard


